App Preview Length: Official Specs for Developers
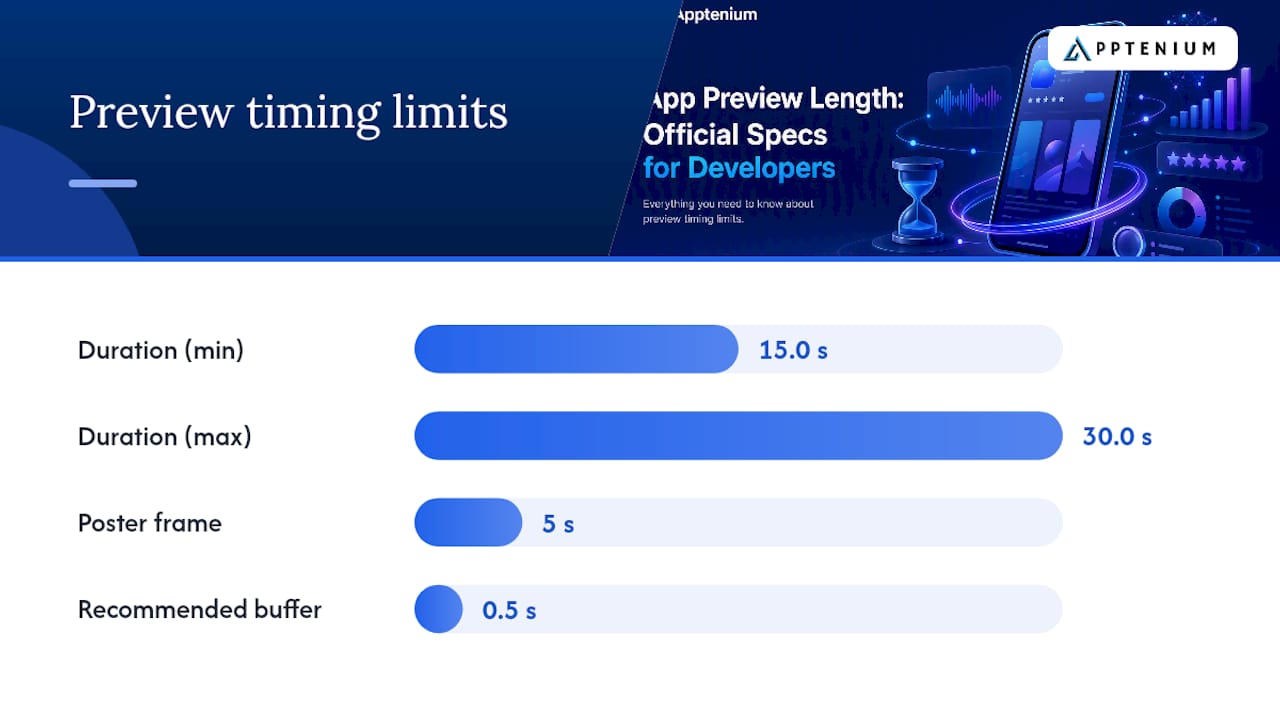
App Store preview videos must run between 15.0 and 30.0 seconds, with no exceptions. That single window, set by Apple’s own specifications, is the first thing to nail down before you shoot a single frame, and it’s stricter than most developers expect.
Here’s what else you need to know before you open your editing software:
Duration: 15.0 to 30.0 seconds, enforced to the decimal
File size: 500 MB maximum per preview
Preview count: Up to three previews per localization, per device size
Formats: H.264 (.mp4/.mov) or ProRes 422 HQ
Poster frame: Defaults to the 5-second mark unless you choose otherwise
If your export runs 30.4 seconds or 14.8 seconds, App Store Connect rejects it. There’s no rounding, no grace period, and no manual override once you hit submit.
For most listings, a practical sweet spot duration is recommended that is long enough to demonstrate real value and short enough to hold attention while staying safely within the allowed duration window. Treat the outer edges of the range as a last resort, not a target.
Key Takeaways
App Store preview videos must run 15.0 to 30.0 seconds, stay under 500 MB, and open with a hook strong enough to hold attention in the first three seconds.
PointDetailsDuration windowKeep previews between 15.0 and 30.0 seconds; aim for 18 to 25 seconds for a safety margin.File size and formatStay under 500 MB using H.264 (.mp4/.mov) or ProRes 422 HQ.Hook timingShow your app’s core value in the first 3 seconds since previews often autoplay muted.Device-specific exportsRecord a master at the largest resolution, then export device-specific versions only when the UI differs.Ongoing optimizationUse a tool like Apptenium’s ASO scanner to audit specs and track conversion across preview variants.
Table of Contents
What Are the Official App Preview Length Requirements?
Apple’s technical specifications leave very little to interpretation, which is actually good news. Once you know the numbers, compliance is mechanical.
The duration requirement is the one that trips people up most often. Apple states plainly that app preview videos must fall between 15.0 and 30.0 seconds, and App Store Connect checks this automatically at upload. A preview that clocks in at 14.9 seconds gets bounced just as fast as one running 31 seconds. Build in a buffer of at least half a second on either end when you finalize your export.
File size and preview count matter almost as much. Apple caps each preview file at 500 MB, and you can upload up to three previews per app localization for each supported device size. That gives you room to show three different angles of your app (onboarding, a core feature, and a secondary feature) without cramming everything into one clip.
SpecificationRequirementDuration15.0 to 30.0 secondsMax file size500 MB per previewPreviews allowedUp to 3 per locale/device sizeAccepted codecsH.264, ProRes 422 HQContainer formats.mp4, .movFrame rateUp to 30 fps recommendedPoster frame default5 seconds into the clipProcessing timeUp to 24 hours after upload
Content rules matter just as much as technical ones. Apple’s guidelines require that previews show actual in-app footage, not staged marketing material or third-party interface mockups. Orientation (portrait or landscape) needs to match the device size you’re targeting, and your poster frame, the still image shown before playback, defaults to the 5-second mark unless you manually select a different one in Media Manager.
Apple’s review process treats the preview video the same way it treats your binary: strict, automated, and unforgiving of small mismatches between what you submit and what the spec allows.
Before you upload anything, run through a quick checklist in App Store Connect: confirm your duration reads within range down to the decimal, verify the codec matches H.264 or ProRes 422 HQ, and double-check that the resolution matches the device slot you’re filling.
Which Device Resolutions Does Media Manager Require?
Your preview needs to match the screen it’s playing on, and Apple’s device lineup means several resolution targets instead of one.
For modern iPhones, the standard portrait resolution is 886 × 1920, with landscape flipping to 1920 × 886. iPads run larger, with portrait previews commonly built at 1200 × 1600. Mac, Apple TV, and visionOS each carry their own dimensions inside Media Manager, and the tool flags mismatches before you finish uploading.
You don’t always need a separate recording for every device class. Apple’s own guidance suggests recording a single master file at the largest resolution your app supports, then letting App Store Connect scale it down for smaller device slots. Export device-specific masters only when your app’s interface actually changes between devices, like a tablet layout with a sidebar that doesn’t exist on phones.
Working inside Media Manager comes down to a few repeatable steps:
Open the app preview section for your target localization
Select the device size slot you’re uploading for (iPhone 6.9-inch, iPad 13-inch, and so on)
Upload your video and confirm it lands in the correct orientation
Choose a poster frame, or leave it at the 5-second default
Check the “All Sizes” view to confirm every device slot has a matching preview
Media Manager also shows processing status in real time, which matters because Apple notes that uploads can take up to 24 hours to finish processing. Don’t submit for review the moment you upload; wait until the status confirms the file processed cleanly.
Pro Tip: Record at your highest supported resolution first, even if your immediate launch only targets iPhone. You’ll thank yourself later when you add iPad support and don’t have to re-shoot everything from scratch.
How Should You Structure a 15-30 Second Preview?
The best-performing previews follow a rhythm, not a random sequence of screenshots stitched together. Structure beats polish almost every time.
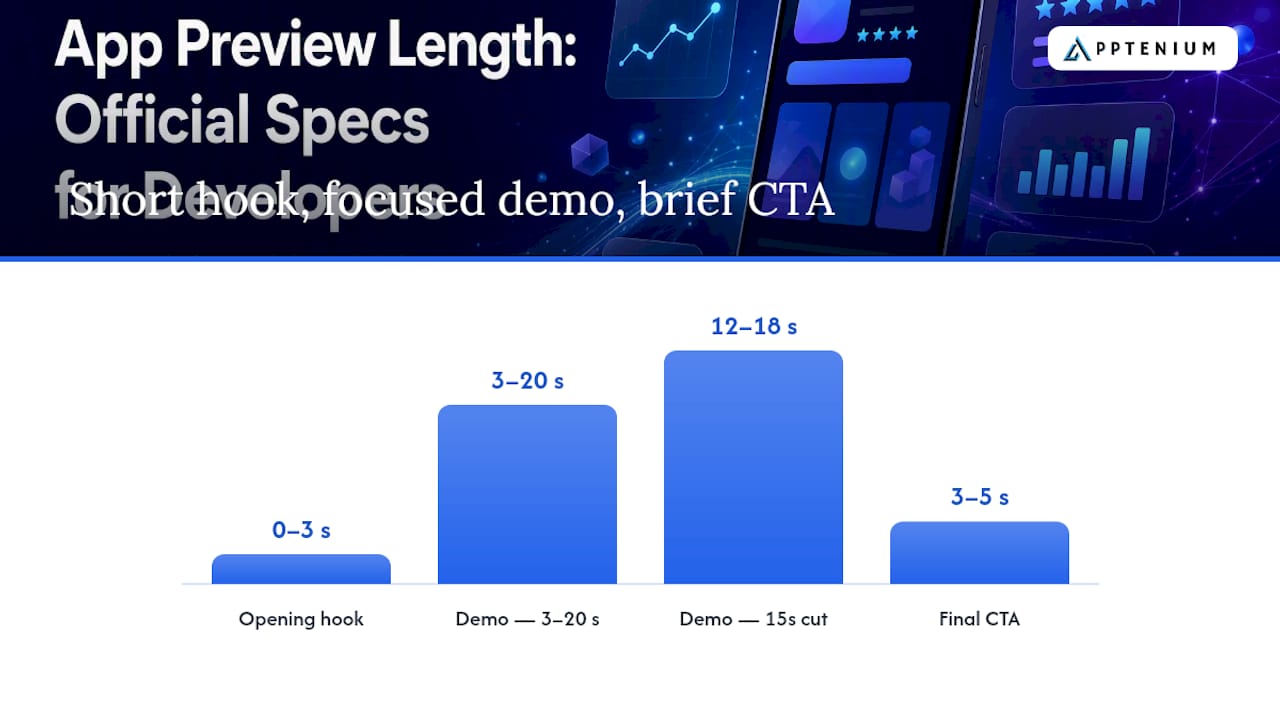
A workable pacing framework looks like this:
Seconds 0 to 3: Open with your strongest visual hook. Show the app doing the thing users came for, not a logo animation.
Seconds 3 to 20 (or 12 to 18 for a 15-second cut): Demonstrate your core value proposition through real in-app footage. Pick two to three features, never more.
Final 3 to 5 seconds: Land on a clear call to action or a poster-frame-worthy shot that represents the app well as a static thumbnail.
That structure isn’t arbitrary. Production workflows tested across app categories consistently point to a fast opening hook, a focused middle section, and a clean closing frame as the pattern that holds viewer attention inside a 15 to 30 second window.
Keep your feature count tight. Trying to cram five features into 25 seconds means none of them get more than a glance, and viewers retain almost nothing. Pick the two or three features that matter most to the audience segment you’re targeting for that particular localization or ad campaign.
A few practical guardrails worth following:
Add captions or on-screen text labels since previews often autoplay muted in listing contexts
Never use copyrighted music you don’t have rights to
Avoid showing third-party app interfaces, system dialogs, or simulated interactions that don’t reflect real behavior
Keep on-screen text large enough to read on a phone screen, not just a desktop preview
Here’s a rough shot list for a productivity app: open on a cluttered task list being cleared in two taps (hook), cut to a calendar sync animation and a notification firing (demo), close on the home screen with a subtle “Download now” caption (CTA). For a game, open on a dramatic win moment, show 10 to 15 seconds of core gameplay loop, and close on a level-up screen or character reveal.
What Export Settings Keep Your File Under 500 MB?
Getting a crisp, compliant file under the 500 MB ceiling comes down to codec choice and bitrate control, not guesswork.
Stick with H.264 in an .mp4 or .mov container for the vast majority of previews; it compresses efficiently without visibly degrading UI text and icons. ProRes 422 HQ is available for teams that need higher fidelity masters, though the tradeoff is significantly larger file sizes that require more aggressive compression before upload.
Frame rate matters more than most developers realize. Apple’s spec community recommends staying at or under 30 fps, and if you recorded your screen capture at 60 fps (common on newer iPhones), don’t just let your export tool drop frames automatically. Editing and exporting natively at 30 fps avoids the stutter that frame-dropping conversion often introduces.
SettingRecommended valueCodecH.264Container.mp4 or .movFrame rate30 fpsTarget bitrate10 Mbps for sharp interface textAudioAAC, optional (captions preferred)
For teams comfortable with command-line tools, FFmpeg is the standard way to transcode a large master file into something upload-ready. A simple compression pass looks something like this:
ffmpeg -i master.mov -c:v libx264 -b:v 10M -r 30 -c:a aac preview_export.mp4
That command sets the video bitrate to 10 Mbps and locks the frame rate at 30 fps, which typically keeps a 25-second preview well under 500 MB while preserving sharp interface text.
Pro Tip: Run a test export at a lower bitrate first (around 6 Mbps) and zoom in on small UI elements like buttons and labels. If they’re still readable, you don’t need the higher bitrate, and you’ll save upload time.
Before you upload, run a final three-point check: confirm the duration reads within 15.0 to 30.0 seconds, confirm the file sits under 500 MB, and confirm the format is either H.264 or ProRes 422 HQ.
How Many Previews Should You Localize?
Apple allows up to three previews per localization for each device size, and how you use that allowance depends on how different your audiences actually are.
For a single-language app, three previews let you cover onboarding, a core feature, and a secondary use case without repeating footage. For apps live in multiple markets, the question becomes whether you need entirely new footage per locale or just translated captions layered over the same visuals.
In most cases, translated captions on identical footage work fine. The interface itself, buttons, icons, layout, stays visually consistent across languages, so what actually needs localization is the on-screen text and any cultural reference points in your script (currency symbols, local landmarks, region-specific examples). Reserve full re-shoots for markets where user behavior or app functionality genuinely differs, like a food delivery app showing different restaurant partners by country.
A simple testing workflow to run once your previews are live:
Form a specific hypothesis (for example, “a captioned demo outperforms a music-only cut for install conversion”)
Build two variants that differ in exactly one element, not five
Run the variant through a store experiment or third-party ASO testing tool
Hold the test for a full measurement window, typically two to four weeks, to account for weekday and weekend traffic patterns
Compare install conversion rate and product page view data, not just raw impressions
Automated ASO audits that check technical specs before creative review tend to catch format and duration issues early, which shortens the cycle between recording a new variant and getting it live for testing.
What Causes App Preview Videos to Get Rejected?
Most rejections trace back to a small handful of repeated mistakes, and nearly all of them are avoidable with a five-minute check before submission.
Duration is the single most common trigger. A preview that reads 30.06 seconds in your editing software gets rejected exactly like one running 32 seconds, because Apple enforces the 15.0 to 30.0 second range strictly, down to the decimal. Always verify the exact runtime in your export tool, not just an approximate glance at the timeline.
Resolution mismatches come in second. Uploading a file sized for iPhone into an iPad device slot, or exceeding the 30 fps frame rate ceiling, both trigger automatic rejection before a human reviewer even looks at your content.
Content violations are the trickier category because they involve judgment, not just numbers. Apple’s App Review Guidelines require previews to reflect actual app behavior. Showing system-level overlays, another app’s interface, or simulated interactions that don’t match your real UI can trigger a guideline violation even if your technical specs are flawless. Using copyrighted background music without a license carries the same risk.
A pre-submission checklist worth running every time:
Confirm exact duration to two decimal places
Confirm file format (H.264 or ProRes 422 HQ) and container (.mp4/.mov)
Confirm resolution matches the exact device slot you’re uploading to
Play the file locally start to finish before uploading, not just a scrub-through
Confirm your poster frame selection represents the app accurately
What Do 15-Second and 30-Second Scripts Actually Look Like?
Seeing the timing broken down shot-by-shot makes the abstract pacing rules concrete.
15-second script (utility app example):
0 to 2s: App opens directly to the core screen, no splash animation
2 to 10s: User taps through the primary action (scan a receipt, log a task, track a workout)
10 to 13s: Result screen shows the completed action with a satisfying visual confirmation
13 to 15s: Closing frame with app icon and a short caption like “Try it free”
30-second script (productivity app example):
0 to 3s: Hook shot of a chaotic inbox or task list being resolved instantly
3 to 12s: Feature one, demonstrated with real taps and real data, captioned clearly
12 to 22s: Feature two, a related but distinct capability (sync, sharing, automation)
22 to 27s: Quick montage of a third smaller feature or social proof element
27 to 30s: Closing CTA frame with app name and download prompt
Script lengthHookDemoCTA15 seconds0 to 2s2 to 13s13 to 15s30 seconds0 to 3s3 to 27s27 to 30s
For each, keep caption text short enough to read in under two seconds per line. Editors working from a shot list like this can cut a rough version in under an hour once footage is captured, since the timing decisions are already made before editing starts.
How Do You Upload and Verify Previews in App Store Connect?
Getting the file technically correct is only half the job. Confirming it actually processed and plays back correctly closes the loop.
Navigate to your app’s media section inside App Store Connect and select the localization you’re updating
Choose the device size slot matching your export (iPhone, iPad, Mac, Apple TV, or visionOS)
Upload your video file and wait for the processing indicator to clear
Select a poster frame manually, or accept the 5-second default if that frame represents your app well
Preview the playback directly inside App Store Connect before submitting for review
Processing after upload can take up to 24 hours, so build that lag into your release timeline rather than uploading the same day you plan to submit for review. If an upload fails silently or gets stuck in processing, the most common causes are an unsupported codec, a corrupted export, or a duration that technically falls outside range even though your editing software rounded the display.
Once processing finishes, always play the preview back inside Media Manager itself rather than trusting your local export file. Compression artifacts or orientation issues sometimes only show up after Apple’s own processing pass.
What Belongs on Your Preview Optimization Checklist?
A preview video isn’t a one-time asset. Treating it as an ongoing optimization surface, the same way you’d treat keywords or screenshots, tends to separate listings that convert from ones that just sit there compliant but unwatched.
Checklist areaWhat to verifyTechnical complianceDuration, file size, format, resolution match device slotCreative clarityHook lands in first 3 seconds, 2 to 3 features max shownAccessibilityCaptions present, text large enough to read on mobileLocalizationCaptions translated, cultural references adapted per marketTesting setupHypothesis defined, variant built, measurement window set
The metrics worth tracking after your preview goes live are impressions, product page views, install conversion rate, and any retention differences tied to which preview variant a user saw before installing. A preview that drives installs but attracts the wrong users shows up as a conversion win with a retention problem, so track both together rather than optimizing conversion in isolation.
Running that audit manually across every localization and device slot gets tedious fast, especially once you’re managing more than a couple of markets. An ASO scanner built to check technical specs alongside listing metadata can flag a duration or format problem before it costs you a review cycle.
Pro Tip: Set a calendar reminder to re-check your top-performing preview every quarter. Device resolutions and Apple’s accepted formats shift periodically, and a preview that passed review a year ago isn’t guaranteed to still meet current spec if you ever need to re-upload it.
What Actually Moves the Needle on Preview Conversion?
Most developers over-invest in production value and under-invest in the first three seconds. That’s backward, and it’s the single biggest gap I see between previews that look expensive and previews that actually convert.
A preview doesn’t need cinematic color grading or a licensed soundtrack to perform well. It needs to show, immediately, the exact moment a user gets value from your app. Teams spend days perfecting transitions between shots five and six when the real problem is that shot one doesn’t hook anyone in the first place. If a viewer can’t tell what your app does within three seconds, the other twenty-seven don’t matter.
The other mistake I’d call out: treating the preview as a one-and-done asset instead of a testable variable. Screenshots get A/B tested constantly. Previews rarely do, partly because producing variants feels expensive and partly because developers assume Apple’s strict spec means there’s only one “correct” way to build a compliant video. There isn’t. Within the same 15 to 30 second window and the same technical constraints, you can test a captioned demo against a faster-paced cut, or a feature-first opening against a problem-first opening, and the conversion differences are often larger than what teams see from screenshot tests alone.
Teams that treat preview audits as part of a regular ASO workflow, checking specs, testing variants, and reviewing conversion data on a schedule rather than only at launch, tend to catch both compliance issues and creative underperformance before either one costs them installs. That’s the kind of ongoing check tools like Apptenium’s ASO features are built to support.
Get Your Preview Video Compliance Checked Before You Upload
Manually re-checking duration, file size, resolution, and format across every device slot and localization eats up time you could spend on the creative work that actually drives installs. Apptenium’s ASO scanner runs that technical audit for you, flagging spec mismatches, missing captions, and localization gaps before you hit submit in App Store Connect.
Beyond the technical check, Apptenium’s broader ASO platform helps you track which preview variant is actually driving install conversion once it’s live, alongside your keyword rankings and competitor data in one place. Instead of jumping between App Store Connect, a spreadsheet, and a separate testing tool, you get the full picture of how your listing performs, previews included, from a single dashboard.
Start with a free preview scan on your current app listing. No credit card required, and you’ll see exactly where your technical setup stands before your next submission.
Where to Verify These Specs Directly
Apple’s own documentation stays the single source of truth for enforcement, and it’s worth bookmarking directly rather than relying on secondhand summaries that can lag behind spec updates.
Upload app previews and screenshots walks through the Media Manager upload process and processing timelines.
Sources
FAQ
What does “0 of 3 app previews” mean?
It means you haven’t uploaded any preview videos yet for that localization and device size, out of the three slots Apple allows per locale. You can fill zero, one, two, or all three slots; none are required.
What are the dimensions of the App Store app preview?
Dimensions vary by device. Modern iPhones typically use 886 × 1920 for portrait orientation, while iPads and other device classes use their own resolutions shown directly inside App Store Connect’s Media Manager.
How do I adjust app display size for previews?
Select the correct device slot in Media Manager before uploading, since each slot expects a specific resolution and orientation. If your footage doesn’t match, export a version resized to that exact device target rather than letting the system stretch or crop it.
What is an app preview?
An app preview is a short video, between 15.0 and 30.0 seconds, that appears on your App Store product page, in search results, and in Apple Ads to demonstrate your app’s actual features and interface before someone downloads it.
How many app previews can I upload per language?
Apple allows up to three previews per app localization for each supported device size, letting you show different features or use cases without exceeding the limit.